Using the Move and Zoom effects | Using interactivity, animation, and audio | Using video in your multimedia
| Compressing Video and Audio
Compressing Video and Audio
Electrifier Pro allows you to compress your audio and video files to allow you to use audio and video on the web, and to take advantage of the latest cutting-edge compression algorithms. Since audio and video compression involves discarding some data, recompressing already-compressed audio or video can significantly reduce the quality of your multimedia. We strongly recommend that you work with your original uncompressed files when compressing audio or video for use with Electrifier Pro.
In this tutorial, you will be compressing a video sample for playback over a 28.8 modem connection. Electrifier Pro allows you to create different movies for different connection speeds, so you can offer a multimedia experience that is targeted to the user's modem.
Tutorial: Compressing Video and Audio
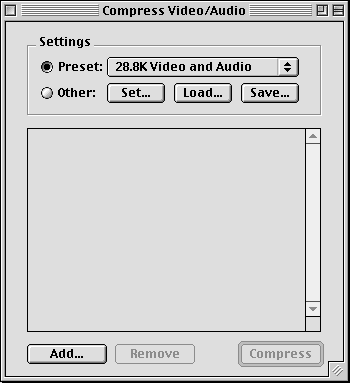
- Open the Compress Video/Audio window by choosing Compress Video/Audio from the Actor menu. The Compress Video/Audio window allows you to compress audio and video actors for use in Electrifier Pro.
|
Tip: If you have more than one file to compress, you can batch-compress groups of files when your computer is idle (while you are in a meeting, for example) for improved efficiency. |

- Choose 28.8K Video and Audio from the Preset pop-up menu in the Settings region of the Compress Video/Audio window to compress your file so it will stream immediately over a 28.8K modem connection.
To reduce file size (and improve video quality), the 28.8K Video and Audio settings scale the video to a size of 160x120. If you want to play the video back at a larger size, we recommend that you keep the dimensions small and play it back at 200% scale in Electrifier Pro.
Details about the current compression options are available by clicking Set in the Settings region of the Compress Video/Audio window.
- Click Add to add your file to the compression list. A standard file-opening dialog will appear allowing you to choose the audio or video file you want to convert.
| Tip: You can also add files to the compression list by drag-and-drop. In the Finder, select the files you want to import and drag them to the Compress Video/Audio window. |
- Click Compress to compress your file using these settings.
- A standard Save dialog will appear, allowing you to name your compressed file. Type a new name and click Save. When you compress multiple files, they will be named automatically.
- If the compression will take longer than a few seconds, a progress dialog will appear, showing how much of the movie has been converted.
- Once you have compressed the file, you are ready to bring it into Electrifier Pro. Create a new movie by choosing New from the File menu. Do not include a sprite track, so that your video will stream more efficiently.
- In the Finder, click the compressed video file and drag it into the Electrifier Pro movie window. You are now ready to enhance your video with sound, animation, and interactivity to create a complete multimedia experience!
For more information
For more information about compressing audio and video, see the Compressing Audio and Video appendix.
Using the Move and Zoom effects | Using interactivity, animation, and audio | Using video in your multimedia
| Compressing Video and Audio
Copyright © 1998 Electrifier, Inc. All rights reserved.
